
Getting rid of dog smell in a car takes five steps in order: strip out hair and dander, vacuum thoroughly, apply an enzyme treatment, extract the residue, then dry the interior completely and repeat monthly maintenance. Enzymes digest the proteins and oils causing the odor; air fresheners only cover the smell for a few hours. If the smell returns after two full cleaning cycles, the odor has likely reached the seat padding or ducting, and that’s a job for a professional.
TL;DR:
- Removing embedded dog odor requires thorough enzyme treatment, multiple extraction steps, and careful drying to prevent residual mold growth.
- Addressing HVAC sources involves replacing the cabin air filter and neutralizing ductwork, as smells can emanate from vents rather than upholstery.
- For persistent or heavily saturated odors, professional deep cleaning with industrial equipment and targeted treatments is often necessary.
- Spot treatments like baking soda, charcoal, and ventilation help temporarily, but long-term removal depends on comprehensive fiber and padding cleaning.
- DIY methods fail if odor has penetrated seat padding or ductwork, making professional intervention the best option for complete odor eradication.
Table of Contents
- Immediate Steps to Reduce Odor Right Now
- The Full Deep-Clean Workflow That Actually Removes the Smell
- Cleaning Fabric, Leather, Mats, and Headliner Without Damage
- Are Your Vents Spreading the Dog Smell Around?
- What to Do About Urine, Vomit, and Other Bio-Stains
- Drying and Long-Term Prevention Habits
- Your Trunk Kit and Weekly Maintenance Routine
- When DIY Isn’t Enough and It’s Time to Call a Professional
- Why Removal Beats Masking, Every Time
- Master Odor Removal: Same-Day Vehicle Odor Service Done Right
- Sources
Immediate Steps to Reduce Odor Right Now
Before you commit to a full deep clean, there’s a faster version for when you need the car to smell decent in the next 20 minutes, not the next weekend.
Start by opening every door and running the fan on fresh air intake, not recirculate, for a few minutes. That single move clears out the trapped air that’s making everything smell worse than it actually is.
- Clear loose debris and hair first. Shake out floor mats and pull visible hair off seats with a rubber glove or lint roller before you do anything else.
- Blot, don’t rub, any wet spots. Press a clean towel straight down on damp patches to pull moisture out instead of pushing it deeper into the fibers.
- Hit wet spots with an enzyme spray if you have one on hand. Even a light application starts breaking down the odor molecules instead of just masking them.
- Set out a small dish of baking soda or a charcoal sachet. Leave it in the footwell overnight for passive odor absorption.
- Crack the windows and let the car sit ventilated. Cross-airflow for an hour does more than any spray you’ll find at a gas station.
This gets you through the next drive. It’s not a fix. Skipping the deeper steps below just means the smell comes back, usually within a day or two, because the source is still sitting in the carpet fibers.
The Full Deep-Clean Workflow That Actually Removes the Smell
Dog odor doesn’t sit on top of your upholstery. It gets absorbed into the fibers themselves, where oils, dander, and saliva work their way past the surface. That’s exactly why spraying air freshener over dog smell in your car never lasts. You’re perfuming a sponge that’s still full of the thing causing the smell.
The fix is a four-stage sequence, and skipping a stage is why most DIY attempts fail halfway through.
- Remove the hair and dander first. A rubber bristle brush pulls embedded hair out of carpet and upholstery far better than a vacuum alone. Follow with a vacuum that has a crevice tool, and don’t skip under the seats. That’s where the densest hair mats build up and where owners forget to look.
- Apply an enzyme cleaner and give it time to work. Spray it on generously enough to soak into the fibers, not just the surface, and let it sit for the dwell time listed on the bottle, usually several minutes. Enzymatic cleaners break down the actual organic molecules causing the odor instead of covering them, which is the entire difference between removing a smell and hiding it.
- Agitate, then extract. Work the treated area with a soft brush to help the enzymes reach deeper into the material, then pull the moisture and dissolved residue out with a wet vacuum or a rented extractor. This step is where most people quit early, and it’s the one that actually removes what the enzyme loosened up.
- Repeat on heavily saturated spots, then finish hard surfaces. Dashboards, door panels, and console cupholders get a wipe-down with a mild all-purpose cleaner and, if needed, a light neutralizer pass. This full multi-stage deep-clean process is what distinguishes a car that smells clean for a week from one that smells clean permanently.
Pro Tip: Keep the treated area moist while the enzymes work by laying a damp towel over it. Evaporation cuts enzyme activity short, and a covered towel keeps the surface working the full dwell time instead of drying out in five minutes.
One warning worth repeating: don’t oversaturate the carpet, and don’t use heat to speed drying while enzyme residue is still present. Heat can set remaining proteins into the fibers permanently, locking in exactly what you’re trying to remove.
Cleaning Fabric, Leather, Mats, and Headliner Without Damage
Every surface in your car reacts differently to enzyme cleaners and moisture, and treating a headliner the same way you’d treat a carpet is how people end up with water stains instead of a clean interior.
- Fabric seats and carpet: Enzyme cleaner, brush agitation, then full extraction works well here, but avoid soaking through to the foam backing underneath, which traps moisture and grows odor-causing bacteria all over again.
- Leather and vinyl: Skip standard enzyme formulas, since some break down leather’s natural oils and finish. Use a leather-safe cleaner followed by a conditioner to replace lost moisture and prevent cracking.
- Rubber and carpet floor mats: Pull them out and wash them separately with soap and water or a dedicated mat cleaner. Let them dry completely in the sun before putting them back, since trapping any residual moisture against the car floor restarts the whole odor cycle.
- Headliner fabric: This is the one surface where less is more. Mist lightly, blot gently, and never soak. Headliner backing absorbs water slowly and dries even slower, which makes it one of the most common places for mildew smell to start if you overdo the cleaning.
If leather is your main concern, a dedicated leather odor removal approach handles the conditioning step that generic advice usually skips.
Are Your Vents Spreading the Dog Smell Around?
If the smell hits hardest the second you turn the fan on, or shows up strongest at startup before it fades, your HVAC system is part of the problem, not just the seats.
- Odor that’s stronger with the fan on high than with it off points straight to the cabin air filter or the intake area.
- Replace the cabin air filter; it’s a cheap part that absorbs an enormous amount of dander and moisture over time and rarely gets swapped as often as it should.
- Spray a neutralizer near the intake vent opening, never directly into the vents themselves, since liquid inside ductwork can cause its own mold problem.
- Thermal fogging and controlled molecular neutralization exist for HVAC systems, but they’re professional-only tools. Ozone treatments can neutralize deep-set odors but carry real safety risks with prolonged exposure, which is why many odor specialists skip ozone entirely in favor of safer methods.
Pro Tip: Run the AC on max cold with the windows down for ten minutes before checking whether the smell is vent-sourced. If it gets noticeably worse, the filter is the culprit, not the upholstery.
Air fresheners can’t reach any of this. They sit in the cabin doing nothing for a smell that’s coming from a part of the car they never touch.
What to Do About Urine, Vomit, and Other Bio-Stains
Biological accidents produce the strongest, most stubborn car odors, and treating them casually is how a five-minute mess turns into a smell that lingers for months.
- Contain it immediately. Blot with paper towels or a clean cloth, pressing straight down. Rubbing pushes contamination deeper into the carpet fibers and widens the affected area.
- Apply an enzyme cleaner generously, then wait. Enzyme cleaners that digest proteins and uric acid need real contact time, usually 15 to 20 minutes, and the area needs to stay moist the whole time for the enzymes to keep working.
- Extract fully with a wet-dry vac. Pull out as much liquid as the machine can manage, then repeat the entire enzyme-and-extract cycle if any smell remains once the area dries.
- Check whether the padding underneath is contaminated. If liquid soaked through to the foam, surface cleaning won’t reach it, and that’s when seat foam contamination requires professional extraction or partial seat disassembly.
Urine is particularly persistent because uric acid crystallizes as it dries, and dried crystals reactivate with humidity, which is why a “cleaned” stain can start smelling again on a hot day weeks later. That reactivation cycle is the single biggest reason bio-stains need enzyme treatment specifically, not just soap and water.
Drying and Long-Term Prevention Habits
Skipping the drying step undoes everything you just did, since any leftover moisture becomes a breeding ground for the bacteria that cause new odor.
- Ventilate with all doors open for at least 30 minutes after extraction, and point a low-heat fan into the cabin if you have one.
- Silica packs or a car-specific desiccant bag speed up drying in humid climates where air alone isn’t enough.
- Leave an open box of baking soda in the footwell overnight for ongoing surface absorption, and swap in a charcoal sachet for longer-term passive control between deep cleans.
- Towel-dry your dog before they get in the car. Moisture on the coat activates the bacteria responsible for that classic wet-dog smell, so a dry dog means a cleaner-smelling car from the start.
- A washable seat cover or hammock keeps hair and dirt off the actual upholstery, which cuts your cleaning time down dramatically.
Pro Tip: Keep a towel clipped to the headrest specifically for drying your dog before rides. It sounds minor, but it’s the single habit that prevents the most odor buildup over a year of regular trips.
Your Trunk Kit and Weekly Maintenance Routine
A five-minute item kept in the trunk is worth more than an occasional deep clean, since consistency is what actually prevents odor from building back up.
- Trunk kit essentials: enzyme spray, two or three microfiber towels, a small container of baking soda, a lint roller, and a pair of gloves for handling wet messes.
- Weekly: quick vacuum pass and a wipe-down of hard surfaces takes five minutes and stops hair from matting into the fibers.
- Monthly: a light enzyme mist across fabric seats and carpet keeps odor-causing buildup from accumulating between deep cleans.
- Every two to three months: a full deep clean following the four-stage workflow above, timed to how often your dog actually rides along.
- On schedule: replace the cabin air filter and swap out charcoal sachets, both of which lose effectiveness gradually without any obvious warning sign.
Owners who travel with dogs several times a week should lean toward the shorter end of that deep-clean window. For more habits that keep a cabin smelling clean between full treatments, these vehicle freshness tips cover the small routines that add up.
When DIY Isn’t Enough and It’s Time to Call a Professional
Two full DIY cycles, done properly with enzymes and real extraction, resolve most dog odor. When they don’t, the contamination has usually moved somewhere a spray bottle can’t reach.
- Odor returns within a day or two after two thorough cleanings. That pattern points to saturation in the seat foam or carpet backing, not the surface fibers.
- The smell is strongest through the vents, not the seats. That means ductwork or evaporator contamination, which needs specialized equipment to treat safely.
- You can see or smell mold, not just dog odor. Mold growth means moisture got trapped somewhere during a previous cleaning attempt, and it needs targeted remediation, not another round of enzyme spray.
- The car has years of buildup from regular pet travel. Deep-set, long-term contamination in padding and carpet backing typically needs disassembly and industrial extraction equipment a home setup can’t match.
Professional treatment usually means full seat and carpet extraction, targeted enzymatic or molecular neutralization, and, where needed, partial disassembly to reach padding that DIY tools can’t access. Ask any provider directly whether they use ozone or chlorine treatments, since both carry real health and material risks despite being common in the industry. For a look at how a thorough eco-friendly workflow handles these deeper cases without those chemicals, it’s worth understanding what separates a real fix from a temporary one.
Why Removal Beats Masking, Every Time
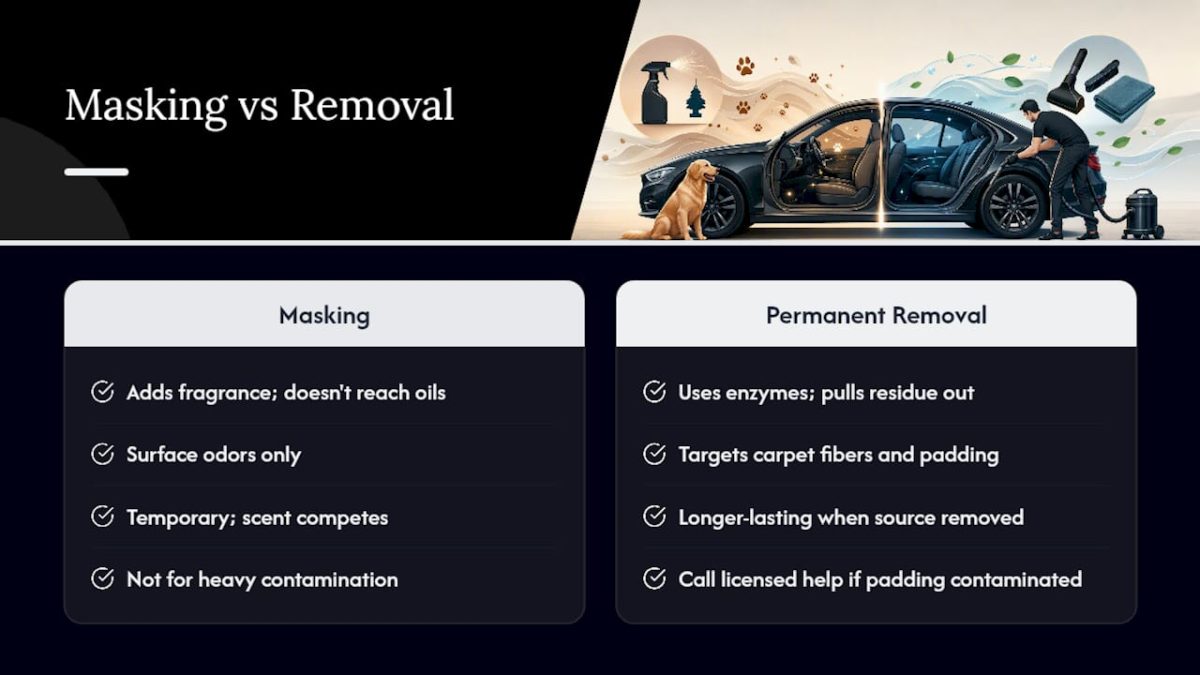
Most odor advice online is really just fragrance advice, and that’s the wrong lens entirely. A car freshener clipped to the vent doesn’t touch the oils sitting in your carpet fibers; it just competes with them for a while. Real removal means treating the source with enzymes and pulling the residue out, not layering a new smell on top of an old one.
That’s also why safe, non-ozone methods matter more than raw power. Ozone can knock down a stubborn smell, but it comes with exposure risks that outweigh the convenience for most vehicle interiors. Follow the workflow above for routine buildup, and don’t hesitate to bring in licensed help once contamination reaches the padding. Some odors just aren’t a spray-bottle problem anymore.
— Master
Master Odor Removal: Same-Day Vehicle Odor Service Done Right
When the smell has soaked past what a weekend of scrubbing can fix, Masterodorremoval offers something a bottle of enzyme spray can’t: a licensed technician who can reach contamination inside the padding and ductwork without tearing your interior apart guessing.

The vehicle service uses green-certified methods and avoids ozone and chlorine, employing molecular neutralization techniques designed to protect high-end interiors where harsh chemicals can cause damage. Technicians often provide prompt service, so a car with persistent odors doesn’t have to wait long for treatment. The service is suited for owners needing professional treatment that reaches seat foam and vents beyond typical DIY methods. If your car falls into that category, see how the full vehicle odor process works and book an assessment to get a clear timeline for your specific interior.
Sources
- How to Get Dog Smell Out of Your Car | Chemical Guys
- How To Get Rid Of Dog Smell In Car Permanent Deep Clean – CarXplorer
- Reducing wet dog smell in cars | Hill’s Pet
- DIY Car Detailing After Dog Mess — Enzyme & Wet‑Dry Vac | Car-Details
Recent Comments